
NotePad++ Installation HOW-TO
Note: The original HOW-TO instructions provided by https://www.willnwish.com/complie-java-code-directly-notepad/ under the Creative Common License. This HOW-TO page is also under the same Creative Common License.
A NOTE ABOUT JAVA:
-
Please click on the "Java SDK Install" tab for details on installing the necessary software to run and, more importantly, COMPILE java programs. Many computer have "java" pre-installed but not the necessary Java SDK (or JDK) files necessary for programming.
-
If you don't have java SDK (or JDK) installed on your computer please install the Java SDK first before completing the rest of the NotePad++ installation.
Download and Install NotePad++
-
Obtain the latest version of NotePad++ from http://notepad-plus-plus.org/ which is available for free.
Configuring NotePad++to compile and run Java Programs
-
Verify the NppExec Plugin is installed.
- First check the Plugins menu and see if NppExec is already installed...if you don't see NppExec listed on the menue then it must be installed. Continue to steps 2 - 7.
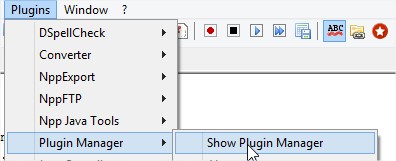
- Open NotePad++ and open the Plugin menu (Alt+P)
- Plugins->Plugin Manager->Show Plugin Manager.
- When you click open Plugin manager you will get a new window with the list of available plugins and installed plugins on your Notepad++
- Now search for the plugin named NppExec in the list of available of plugins and install it.
- After completion of installing the plugin NotePad++ needs to be restarted to take the changes.
- After restating Open Plugin menu (Alt+P) you can find the installed plugin NppExec in the plugin menu.
-
Settings for the NppExec to be done one-by-one:
- Disable Console command history.
- Enable Show Console Dialog.
- Enable save all files on execute.
- Enable Follow $(CURRENT_DIRECTORY).

-
To compile your java source code, open the execute window [F6 or by menu: Plugins->NppExec->Execute...] and enter these command codes.
-
cd $(CURRENT_DIRECTORY)

javac $(FILE_NAME) -
Alternatively, If the two lines above do not work, you can enter longer command codes**:
cd
                        $(CURRENT_DIRECTORY)

javac $C:\Program Files\Java\jdk1.8.0_45\bin\(FILE_NAME) -
**This assumes Java SDK 1.8.0_45 is installed in the default location at:
C:\Program Files\Java\jdk1.8.0_45\bin\ as mentioned in the NOTE ABOUT JAVA -
Explanation of the above command codes:
The 1st code line in the above command will change the directory to current directory where your java sourcecode will be saved. After saving your sourcecode, the next command code line will invoke the Java compiler. And the rest is done by Java compiler to translate your java sourcecode into java bytecode (in binary)...you are now ready to have your java bytecode be run/executed by the java virtual machine (jvm)
-
Using saved command codes to compile and/or run your java programs...this will save you from having to type in each code line every time:
-
After completing the command codes in step 4 above and successfully compiling your program, save the two code lines as compileJava so that next time you need not to enter the two command code lines every time you want to compile your programs.
-
To run your compiled java code enter these command code lines again in temporary code and save as runJava**.
cd $(CURRENT_DIRECTORY)

          java $(NAME_PART)
The first line in the above command code is same as the first line of the command to compile your java sourcecode (i.e. use the same directory or folder) and the second line the above command code invokes the java virtual machine (jvm) to run/execute your java bytecode that was compiled in step 2 above.
-
The following command codes combine the steps 1 and 2 so that you can both compile and run commands in a single step. Save these code lines as compileAndRunJava**.
cd $(CURRENT_DIRECTORY)

          javac $(FILE_NAME)

java $(NAME_PART) -
Alternatively, If any of the lines above do not work, you can enter longer command codes**:
cd
                        $(CURRENT_DIRECTORY)

javac $C:\Program Files\Java\jdk1.8.0_45\bin\(FILE_NAME)java$C:\Program Files\Java\jdk1.8.0_45\bin\(NAME_PART)**This assumes Java SDK 1.8.0_45 is installed in the default location at:
C:\Program Files\Java\jdk1.8.0_45\bin\
                    as mentioned in the NOTE ABOUT JAVA at the top of this page.
-
-
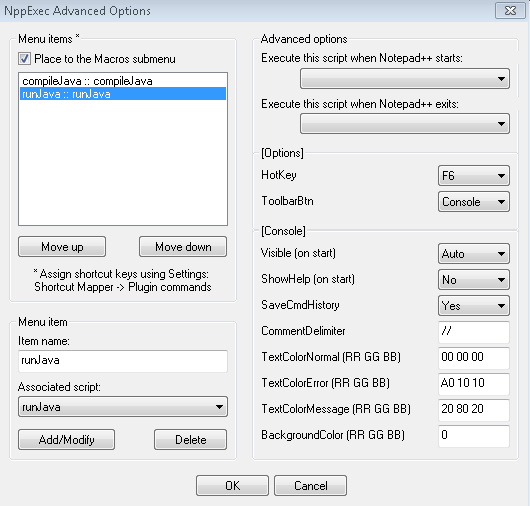
If you choose, you can create menu shortcuts for compiling and running the command codes (i.e. save yourself even more typing):
- Open the Plugin menu
- click on menu: Plugin->NppExec->Advanced Options
- check the option: Place to macro submenu
- as shown below, do the followng three steps for each of the
saved command codes (compileJava, runJava, and compileAndRunJava)
from step 4 above:
- in the Associated script dropdown list...select any one command code script...for example: compileJava
- in the Item name: textbox, type the name of one of the saved command code scripts...for example: compileJava
- click on Add/Modify button
- So that a new menus are created under macros menu, click OK...you
might have to re-start NotePad++ for the new menus and macros
to appear.
-
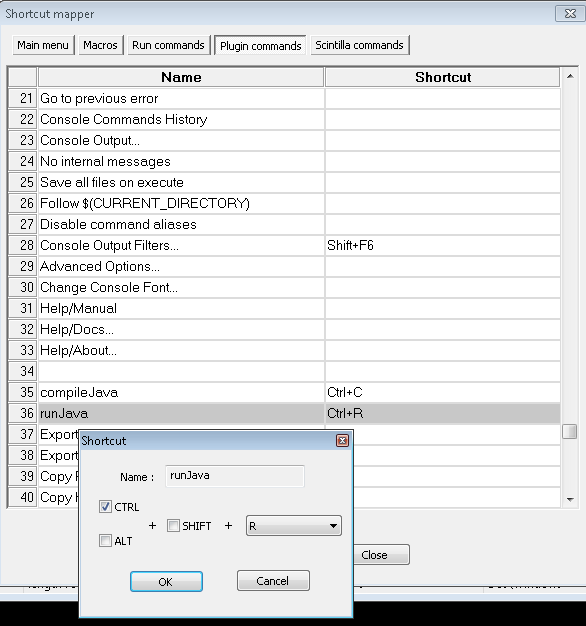
If you choose, you can create shortcut keys, for each of the above menu shortcuts for compiling and running the command codes (i.e. save yourself even more typing):
- open the Settings menu
- click on Settings -> Shortcut Mapper -> Plugin Commands
- scroll down to find your menu shortcuts (compileJava,
runJava, and compileAndRunJava) from
step 5 above and assign your own shortcut keys.
(I prefer Ctrl+C for compileJava, Ctrl+R for runJava, Ctrl+Alt+R for compileAndRunJava).
TextPad Installation
Note: TextPad is one of the simplest to set-up and easy-to-use programming editor for Java.
A NOTE ABOUT JAVA:
-
Please click on the "Java SDK Install" tab for details on installing the necessary software to run and, more importantly, COMPILE java programs. Many computer have "java" pre-installed but not the necessary Java SDK (or JDK) files necessary for programming.
-
If you don't have java SDK (or JDK) installed on your computer please install the Java SDK first before completing the rest of the TextPad installation.
Download and Install TextPad
-
If you have installed the Java SDK in the default directory [look for:
C:\Program
                  Files\Java\jdk1.8.0_45\
or similar version number], TextPad, during installation, will automatically configure its menu, tools, and keyboard shortcuts so that you can Compile and Run java progrfams. -
Obtain the latest version of TextPad from http://www.textpad.com/ which is available for evaluation for free and a nominal cost for personal or site licensing.
-
Verify Textpad is pre-configured to work with Java (i.e. Java SDK is installed properly) use the menu and select:
Configure > Preferences > Tools > Add (drop down list) > SDK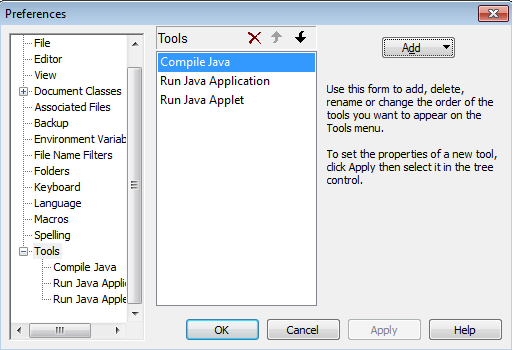
-
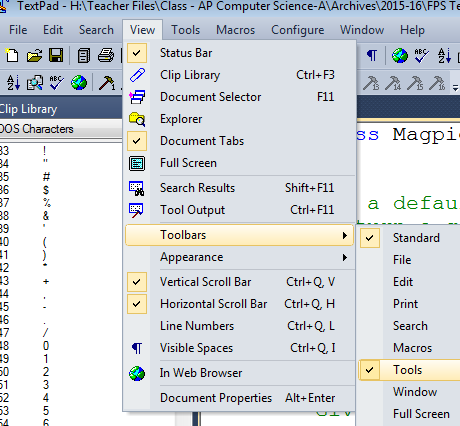
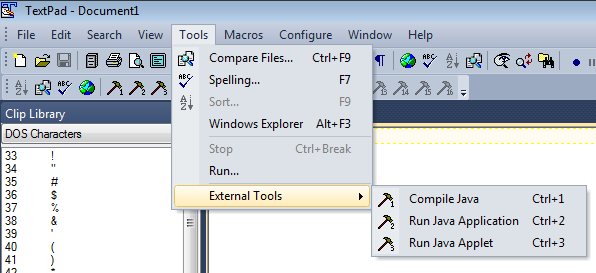
To enable the "Hammer" button shortcuts, use the menu and select
View > Toolbars > Tools
-
To develop java programs, the following options are available (as shown in the image below):
- Hammer1 button will compile java source code
- Control-1 keyboard shortcut will compile java source code
- Hammer2 button will run java byte code
- Control-2 keyboard shortcut will run java byte code
Eclipse Installation
...in progress
A NOTE ABOUT JAVA:
There are two "parts" to java:
-
The first part is the JRE (java runtime environment) which allows java programs to only RUN on your computer; many computers have the JRE installed by default...so it looks like java is installed.
-
Programmers are interested in the second part of Java which is the Software Developer's Kit or SDK (sometimes called JDK for Java Developer's Kit) which allows java programs to be COMPILED and RUN on your computer. If you wish to write java programs, then you (or another person) will have to install the java SDK (or JDK) prior to installing NotePad++.
-
The file to download and steps to install the Java SDK (or JDK) can be found on Oracle's website: http://www.oracle.com/technetwork/java/javase/downloads/index.html. You will need to know what operating system version you are using...most beginning programs will be using the Windows x64 version at the bottom of the table. You will also have to click on the "Accept License Agreement" button before you are allowed to download.
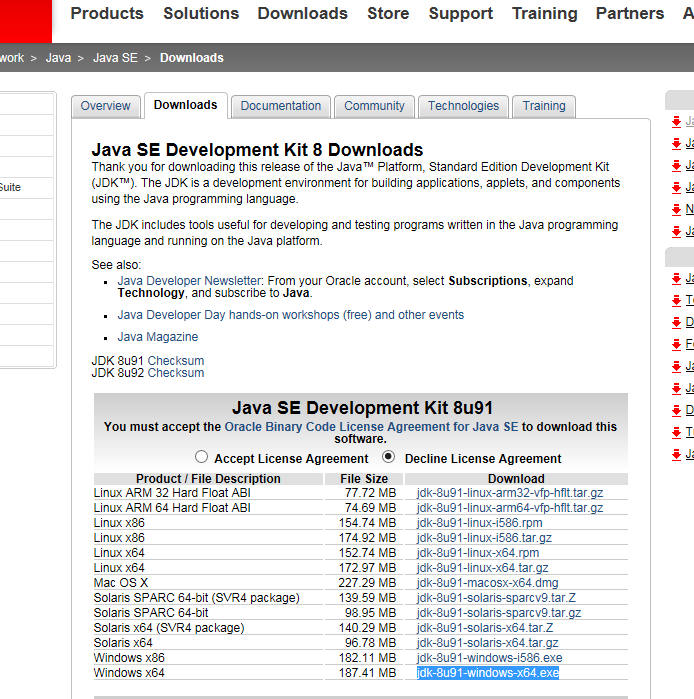
-
The default location for the java SDK is
C:\Program
                    Files\Java\jdk1.8.0_45\bin
...however, newer versions may become available so the version number (i.e. the "1.8.0_45" part) may be different for each computer.